
This year Wes and I thought that in addition to our regular Christmas shopping, it would be nice to make some of our gifts ourselves. While this definitely helped with the budget, it was also a nice way to have special, personal gifts for our family. As I was searching through lots of tutorials for gift ideas, I came across one for a Ruffled Camera Strap by Kevin {&} Amanda. Let me just say I was SUPER excited! My sister loves photography and I thought this would make a fantastic accessory to her {super legit} camera. After looking it over, I knew there were a couple of things I wanted to do a little differently than in the tutorial, but it was definitely a great starting point/idea to get me started!
 |
| Here she is photographing my baby… while I photograph her 🙂 |
To do this you will need 1/2 yard of each of your fabrics. {I thought this was a bit excessive at first, but it’s mainly to get the length without having to piece together strips. There’s plenty leftover!}. You don’t need to have two ruffle layers either, I thought it looked pretty good with just one ruffle {but I already bought the other fabric!} or you could even do a basic cover with no ruffles if you like to keep it simple.

The next step is to measure your strap and cut your fabric pieces to size. {I had to sneakily measure my sister’s, so it’s not pictured, but check out the original tutorial for pictures of hers – which I believe is the same one.}
The strap measurements were 24″ x 1.75″. The original tutorial added an inch to each of these measurements [25″ x 2.75] and then cut two strips and sewed them together. I didn’t see the point in cutting two strips to sew them back together, so I used one piece for the main cover: I doubled the width FIRST then added my extra inch to each measurement, making my strip 25″ x 4.5″. I cut my first ruffle 2″ wide, and the second ruffle 1.75″ wide, using the full length of my fabric.
 |
| I used the straight edge to trim my fabric before cutting since the fabric store doesn’t cut perfectly straight. |
Next I pressed & hemmed the ends of my main piece {1/4″ – using a back-stitch with all seams} and then pressed it the long ways so I could see the middle and to help it keep its shape once it was finished.

I then pressed & sewed a 1/4 seam down the sides of my ruffle strips. I used the “vine” stitch on my vine fabric {how could I not??} and a regular stitch on my zebra fabric. To “ruffle” my strips I used the longest length and the shortest width on my machine, and it did all the work for me!

I then pinned the ends and middle of my fabric and sewed down the middle {Remember to reset the stitch length!}. The first strip was just a little too long, so I had to “scrunch” it as I sewed in a couple places, but it was super easy. After attaching the ruffle to the cover I removed the “basting” stitch {it pulls out pretty easily} and repeated the process with the second ruffle. After the ruffles were attached, I sewed over all three layers on both ends to keep everything secure.
 |
| I placed my ruffle slightly more towards the center since I’d be losing a 1/4″ when I did the final seam |
The last step is to fold the inside in and sew the cover hem {remembering to back-stitch} and then turn the whole thing right side out!
 |
| I added a couple charms on the end… |
 |
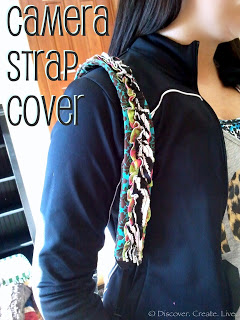
| I love the continuous look of the single piece of fabric for the main cover 🙂 |
Thanks to my lovely sister for modeling her new strap for me!

Oh man, I can't wait to take my sewing class Jan 11th now! Once I know how to use my machine I want to try this!